Why You’ll Love This Japanese Sponge Cake Recipe
If you’re looking for a cake that’s light, fluffy, and bursting with flavor, you’ll absolutely love this Japanese sponge cake recipe. It has a delicate texture that melts in your mouth, making every bite a delightful experience. I adore how easy it’s to whip up, requiring minimal ingredients while still delivering impressive results. The cake can be paired with fresh fruits or whipped cream, adding a rejuvenating twist. Plus, it’s perfect for any occasion, whether it’s a casual gathering or a special celebration. Trust me, once you try it, you’ll want to make it again and again!
Ingredients of Japanese Sponge Cake
When it comes to making a delicious Japanese sponge cake, the ingredients play a vital role in achieving that delightful texture and flavor. You’ll find that many of the items are staples in most kitchens, which is part of what makes this recipe so approachable.
Plus, the combination of simple ingredients creates something truly special. So, let’s go over what you’ll need to get started on this light and fluffy treat.
Ingredients for Japanese Sponge Cake:
- 3/4 cup all-purpose flour
- 2/3 cup sugar
- 1 tablespoon milk
- 3 eggs
- 1 1/2 tablespoons butter
- 1/4 teaspoon baking soda (optional)
- 1 teaspoon vanilla (optional)
- 1 1/2 cups heavy cream
- 4 tablespoons sugar (sifted powdered sugar if not serving immediately)
- Various fresh fruits (like strawberries, peaches, cherries, etc.)
Now, let’s chat about these ingredients a bit. You might be wondering why I mentioned that baking soda is optional. Well, it really depends on how fluffy you want your cake to be.
Some folks swear by it for an extra lift, while others say the eggs do the job just fine on their own. And about the vanilla—if you’re feeling adventurous, go ahead and use it! It adds a lovely aroma, but if you’re out or just not a fan, you can totally skip it.
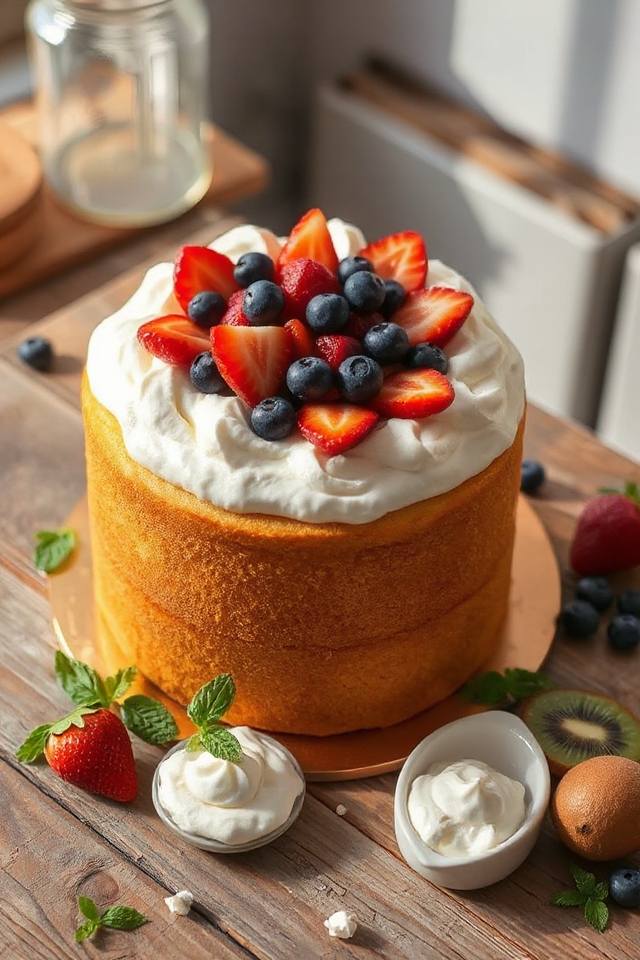
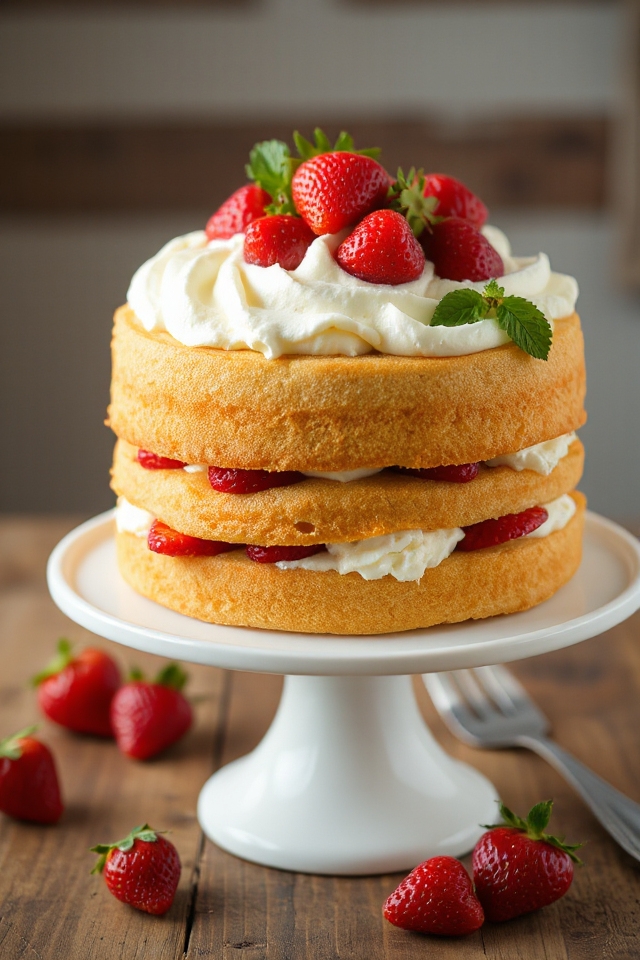
When it comes to the fruit, the sky’s the limit! You can mix and match based on what you have on hand or what’s in season. Just imagine biting into that sweet, juicy fruit layered between the luscious whipped cream and soft cake. Yum!
How to Make Japanese Sponge Cake
Making a Japanese sponge cake is a delightful adventure, and trust me, it’s not as intimidating as it may seem. First off, you’ll want to preheat your oven to a warm 350°F. While that’s warming up, grab a 7-inch round cake pan and grease it up. Oh, and don’t forget to line the bottom with parchment paper—this little step is a lifesaver when it comes to getting that cake out without a hitch.
Now, let’s plunge into the heart of the matter: the batter. Start by whisking together 3 eggs in a bowl until they’re super frothy and light. For a little added warmth (and a fancy touch), you can place that bowl in a larger bowl filled with warm water. This warm water bath helps the eggs get nice and fluffy, which is key to our cake’s airy texture.
Once your eggs are light yellow and singing like a choir, gradually add in 2/3 cup of sugar, whisking all the while—this is where the magic happens. Now, sift in 3/4 cup of all-purpose flour, and if you’re feeling adventurous, toss in that optional 1/4 teaspoon of baking soda. Mix it all gently; we don’t want to deflate those lovely bubbles you just created.
Next up, warm 1 tablespoon of milk in the microwave, and stir in 1 1/2 tablespoons of butter until it melts into a golden pool of goodness. Add this milk-butter mixture to your egg mixture along with a teaspoon of vanilla if you’ve decided to include it. Gently fold everything together, then pour the batter into your prepared pan.
Bake for 25 to 35 minutes, but keep an eye on it. You’ll know it’s done when it springs back when pressed lightly in the center. Once it’s out of the oven and cooling on a wire rack, you can take a moment to brag about your baking skills.
After it cools, slice the cake in half horizontally to create two layers, and it’s time for the fun part—filling and frosting with whipped cream and your choice of fruit. It’s like a sweet canvas waiting for your artistic touch. Trust me; this cake will impress everyone and become a favorite in no time.
Japanese Sponge Cake Substitutions & Variations
While traditional Japanese sponge cake is a classic delight, there are plenty of substitutions and variations you can explore to make it your own.
For a gluten-free option, I use almond flour instead of all-purpose flour. You can also swap out sugar for honey or maple syrup for a unique sweetness.
Experimenting with flavors like matcha or citrus zest adds a revitalizing twist. If you want a richer cake, try incorporating a bit of cream cheese into the batter.
Finally, don’t hesitate to top your cake with different fruits or even a drizzle of chocolate for a delectable finish!
What to Serve with Japanese Sponge Cake
There’s nothing quite like enjoying a slice of Japanese sponge cake, and pairing it with the right accompaniments can elevate the experience even further.
I love serving it with fresh fruit like strawberries or peaches, as their vibrant flavors complement the cake beautifully. A dollop of whipped cream adds a delightful creaminess, too.
For a twist, I sometimes drizzle a light fruit sauce or a hint of matcha on top. If you’re feeling adventurous, consider pairing it with a cup of matcha green tea.
It’s a lovely way to enhance the flavors and create a delightful afternoon treat.
Additional Tips & Notes
To guarantee your Japanese sponge cake turns out perfectly, I recommend paying close attention to the egg whisking process; it’s essential for achieving that light, airy texture.
Make sure your eggs are fresh for the best results. If you find the batter too thick, a splash of warm milk can help.
Don’t skip cooling the cake on a wire rack to prevent sogginess. When whipping cream, use chilled tools for better volume.
Finally, feel free to experiment with flavors; matcha or citrus zest can add a delightful twist.
Trust your instincts, and enjoy the process! Happy baking!