Why You’ll Love This Hawaiian Pineapple Cake Recipe
When you take your first bite of this Hawaiian Pineapple Cake, you’ll understand why it’s a favorite in so many homes. The moist, tender texture pairs perfectly with the sweet, tropical flavor of pineapple, creating a delightful escape to paradise.
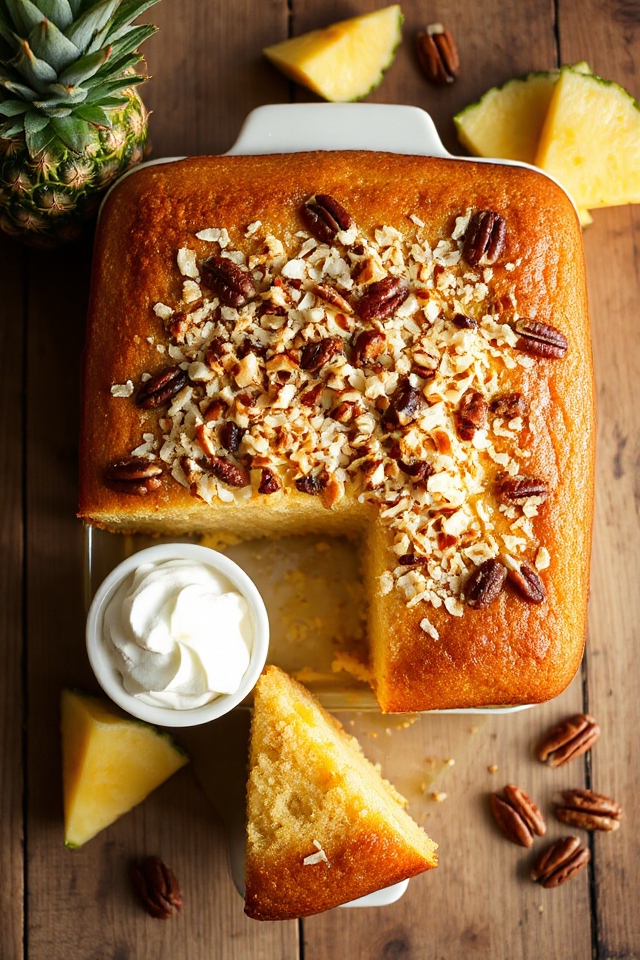
Each slice is a celebration of taste, enhanced by the rich coconut and crunchy pecans that make every bite exciting. It’s incredibly easy to whip up, too, making it a go-to dessert for gatherings and special occasions.
Trust me, this cake will quickly become a beloved staple in your recipe collection, bringing smiles and joy to everyone who tries it!
Ingredients of Hawaiian Pineapple Cake
When it comes to baking, having the right ingredients is key to creating something truly delicious. The Hawaiian Pineapple Cake is no exception. It’s a simple recipe that packs a punch of flavors, combining the sweetness of pineapple with the rich taste of coconut and the crunch of pecans.
Before you plunge into the mixing bowl, let’s gather everything you’ll need. You might be surprised at how straightforward the ingredient list is—most of these items are probably already hanging out in your pantry!
Here’s what you’ll need for this delightful cake:
- 2 cups flour
- 2 cups sugar
- 2 teaspoons baking soda
- 2 eggs
- 20 ounces crushed pineapple, undrained
- 1/4 cup canola oil
- 1/4 teaspoon salt
- 1 teaspoon vanilla extract
- 1 cup evaporated milk
- 1 1/2 cups sugar (yes, more sugar—this cake is sweet)
- 3/4 cup butter or oleo
- 1 teaspoon vanilla extract (just to make sure it’s extra vanilla-y)
- 1 cup pecans, chopped
- 1 cup coconut
Now, before you get started, here are a few things to keep in mind about the ingredients. First, make sure your pineapple is undrained—trust me, that juice is what makes the cake so moist and flavorful.
And when it comes to nuts, feel free to swap pecans for walnuts if you prefer. Not a fan of coconut? You can leave it out, but I wouldn’t recommend it—coconut adds a delightful chewiness that complements the soft cake.
Oh, and if you’re feeling adventurous, throw in some chocolate chips or a sprinkle of cinnamon for a little twist. Just remember, baking is all about having fun and making it your own!
How to Make Hawaiian Pineapple Cake
Making Hawaiian Pineapple Cake is as straightforward as it’s delightful. First, let’s assemble your ingredients: you’ll need 2 cups of flour, 2 cups of sugar, 2 teaspoons of baking soda, and 2 eggs. Don’t forget the star of the show—20 ounces of crushed pineapple (undrained, please), along with 1/4 cup of canola oil, 1/4 teaspoon of salt, and 1 teaspoon of vanilla extract. Trust me, you’re going to want that vanilla flavor to shine through.
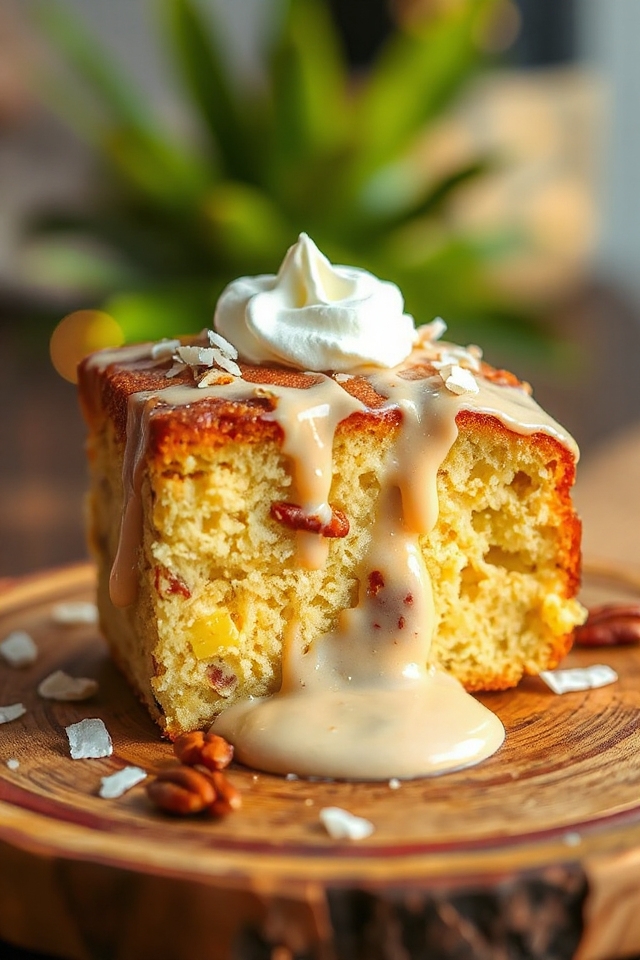
Oh, and we can’t ignore the toppings, which include 1 cup of evaporated milk, an additional 1 1/2 cups of sugar (yes, sugar overload!), 3/4 cup of butter or oleo, another teaspoon of vanilla, 1 cup of chopped pecans, and 1 cup of coconut. It sounds like a lot, but it’s all about that glorious flavor blend.
Now, let’s plunge into the mixing. In a large mixing bowl, beat together the flour, sugar, baking soda, eggs, crushed pineapple, canola oil, salt, and that lovely teaspoon of vanilla extract for a solid three minutes. Just picture it: the ingredients swirling together, creating a vibrant, fruity batter that smells heavenly.
Once it’s well combined, pour it into a 9×13 inch pan—remember, don’t grease or flour the pan, as it’s not needed for this recipe. Pop that beauty into a preheated oven set to 350 degrees and let it bake for about 35 minutes.
While that’s happening, it’s time to prepare the topping. In a saucepan, bring the evaporated milk, 1 1/2 cups of sugar, 3/4 cup of butter, and another teaspoon of vanilla to a gentle boil. After it reaches that bubbling point, toss in the chopped pecans and coconut, and let it cook for just an additional two minutes.
When the cake comes out of the oven, it’s all about timing. Pour the warm topping over the cake while it’s still hot. This part is essential because the cake will soak up all those sweet, nutty flavors, making it incredibly moist and decadent.
Now, you can let it cool, and when you’re ready to serve, don’t hesitate to add a dollop of Cool Whip or a scoop of ice cream on top. It’s like a tropical vacation for your taste buds.
Hawaiian Pineapple Cake Substitutions & Variations
If you’re looking to put your own spin on Hawaiian Pineapple Cake, there are plenty of substitutions and variations you can try.
For a lighter cake, swap half the sugar with honey or maple syrup.
Want a tropical twist? Add shredded mango or macadamia nuts for extra flavor.
You can also use coconut oil instead of canola oil for a richer taste.
If you’re not a fan of pecans, try walnuts or almonds.
For a dairy-free version, replace evaporated milk with coconut milk.
Experimenting with these variations allows you to create a personalized cake that suits your palate perfectly!
What to Serve with Hawaiian Pineapple Cake
What pairs well with the delightful flavors of Hawaiian Pineapple Cake? I love serving it with a dollop of Cool Whip or a scoop of vanilla ice cream to enhance its tropical charm.
Fresh fruit, like strawberries or kiwi, adds a revitalizing touch, balancing the sweetness perfectly. For a bit of crunch, consider offering toasted coconut or chopped nuts on the side.
If I’m feeling adventurous, a drizzle of caramel sauce elevates the dessert experience.
And let’s not forget a cup of coffee or iced tea; they make for a lovely pairing to complement the cake’s rich flavors. Enjoy!
Additional Tips & Notes
To enhance your Hawaiian Pineapple Cake experience, I’ve got some handy tips.
First, use room-temperature ingredients for a fluffier batter.
If you want extra coconut flavor, consider toasting the coconut before adding it to the topping.
For a bit of crunch, try adding walnuts along with the pecans.
If you’re short on time, you can skip the boiled topping and just dust the cake with powdered sugar.
Finally, this cake tastes even better the next day, so make it ahead of time if you can.
Enjoy every bite, and don’t forget the Cool Whip or ice cream on the side!