
Why You’ll Love This Date Nut Cake Recipe
If you’re looking for a unique dessert that combines rich flavors and a moist texture, you’ll love this Date Nut Cake recipe. It’s a delightful balance of sweet dates and crunchy walnuts that creates a satisfying bite every time.
I appreciate how easy it’s to make, yet it feels special enough for gatherings. The aroma while it bakes fills your kitchen with warmth, inviting everyone to indulge.
The cake’s moistness and subtle sweetness make it perfect on its own or paired with whipped cream. Trust me; this cake will become a favorite in your dessert rotation. You won’t regret trying it!
Ingredients of Date Nut Cake
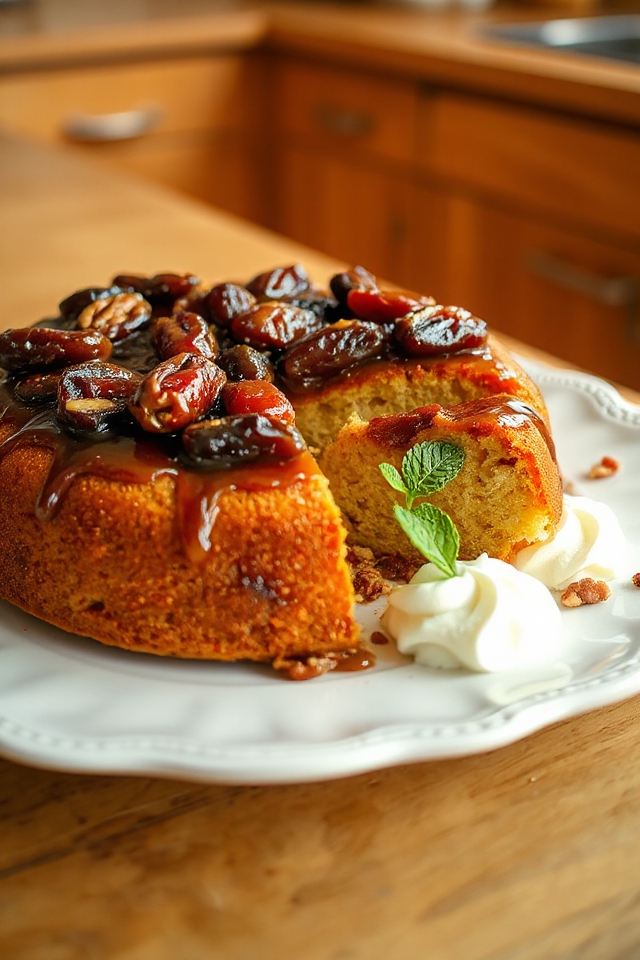
When it comes to baking a cake that feels both comforting and a little exotic, the Date Nut Cake is a standout. With its unique blend of sweet dates and crunchy walnuts, this cake is sure to impress your friends and family.
Imagine the smell of this cake wafting through your kitchen, drawing everyone in like moths to a flame. It’s the kind of recipe that makes you feel like a baking pro, even if your last attempt at a cake resulted in a kitchen disaster.
But don’t worry; this cake is pretty foolproof, and the ingredients are simple to gather. So, let’s dive right into what you’ll need to create this delightful treat.
Ingredients for Date Nut Cake
- 1/2 package of dates
- 1 cup of hot water
- 1 teaspoon of baking soda
- 1/2 cup of walnuts (chopped)
- 1 1/2 cups of cake flour
- 1 teaspoon of baking powder
- 2 tablespoons of butter (softened)
- 1 cup of sugar
- 1/2 teaspoon of salt
- 1 egg
- Additional 1/2 package of dates (chopped)
- Additional 1/2 cup of walnuts (chopped)
- Additional 3/4 cup of sugar
- Additional 2/3 cup of water
Now, let’s chat a bit about these ingredients. Dates are the star of this show, bringing both sweetness and a chewy texture that contrasts beautifully with the crunch of walnuts.
If you’ve never worked with dates before, they can be a bit sticky, but that’s part of their charm. Just make sure to chop them well so they’re evenly distributed throughout the cake.
And don’t fret too much about the sugar; while it seems like a lot, it balances out the earthy flavors of the nuts and the richness of the butter.
If you want to get creative, consider adding a sprinkle of cinnamon or a dash of vanilla extract for an extra layer of flavor. After all, baking is all about having fun and making it your own, right?
How to Make Date Nut Cake
Making Date Nut Cake is like starting a delightful little adventure in your kitchen. You’ll want to start by preheating your oven to a cozy 350 degrees F. While that’s warming up, grab an 8-inch cake pan and prepare it by greasing it well or lining it with parchment paper. Trust me, you don’t want your masterpiece to stick to the pan like a stubborn friend who won’t leave the party.
Now, let’s get to the fun part. In a mixing bowl, combine 1/2 package of dates with 1 cup of hot water and 1 teaspoon of baking soda. This mixture needs to cool completely, so it’s a great chance to take a break and maybe dance a little—who doesn’t love a good kitchen boogie?
Once it’s cooled down and you’re feeling a little silly, add in 1/2 cup of chopped walnuts, 1 1/2 cups of cake flour, and 1 teaspoon of baking powder. Gently stir those ingredients together, because we want to keep the airiness of the cake intact. Next, toss in 2 tablespoons of softened butter, 1 cup of sugar, 1/2 teaspoon of salt, and 1 egg. Mix it all together until well combined. Don’t worry if it looks a bit lumpy; that’s just the character of homemade cakes shining through.
Once everything is mixed, pour your batter into the prepared cake pan. Pop it into the oven and let it bake for about 30 to 35 minutes, or until a toothpick comes out clean.
While that beauty is baking, you can prepare the topping by cooking the remaining 1/2 package of dates, 2/3 cup of water, and 3/4 cup of sugar until it’s syrupy. This will give your cake that lovely shine and extra sweetness that will make everyone want seconds.
Once your cake is baked, let it cool slightly before drizzling that delicious topping over it. Serve it warm, maybe with a dollop of fresh whipped cream, and watch as your friends and family devour it. You might even get a few compliments, and who doesn’t love that?
Date Nut Cake Substitutions & Variations
While traditional Date Nut Cake has its own charm, you can easily customize it to suit your taste or dietary needs.
For a healthier twist, swap out white sugar for coconut sugar or honey. If you’re gluten-free, use almond flour instead of cake flour.
I often add different nuts like pecans or almonds for a unique flavor. You can even mix in dried fruits like cranberries or apricots.
If you’re vegan, replace the egg with a flaxseed egg or applesauce.
These simple substitutions let you create a Date Nut Cake that’s perfect for any occasion!
What to Serve with Date Nut Cake
Although Date Nut Cake is delicious on its own, pairing it with the right accompaniments can elevate your dessert experience.
I love serving it with a dollop of fresh whipped cream, which adds a light, creamy texture that complements the cake’s richness. Alternatively, a scoop of vanilla ice cream creates a delightful contrast.
For a touch of sophistication, drizzle some warm caramel sauce over the top. Fresh fruit, like sliced strawberries or a citrus salad, can brighten the flavors, too.
No matter what you choose, these additions will make your Date Nut Cake even more enjoyable!
Additional Tips & Notes
To guarantee your Date Nut Cake turns out perfectly, it’s important to pay attention to a few key details.
First, make sure your dates are soft; if they’re too dry, soak them longer in hot water.
When mixing the batter, avoid over-stirring to keep the cake light.
I recommend using fresh walnuts for the best flavor, and toasting them lightly enhances their nuttiness.
Always check for doneness with a toothpick; it should come out clean.
Finally, let the cake cool completely before serving to allow the flavors to meld.
Enjoy your baking adventure!